Fireworks photography - settings for perfect fireworks photos
In this article I will take you by the hand and show you that photographing fireworks is a matter of practice and with a little time and the right camera settings you will succeed the most beautiful fireworks photos.
I myself photograph fireworks since 2009 and have countless fireworks get in front of the lens. Among them are small fireworks as well as large stagings.
Artikel in Deutsch: How-To | Feuerwerk fotografieren – Einstellungen, Tipps (fwkart.de)
- Fireworks photography - settings for perfect fireworks photos
- Quick start - photograph fireworks
- Quick start
- Zylinderbombe im Querschnitt als Poster, Leinwand oder Alu-Dibond
- Contents
- How fireworks work
- The equipment for photographing fireworks
- The technical
- Zylinderbombe im Querschnitt als Poster, Leinwand oder Alu-Dibond
- Zylinderbombe im Querschnitt als Poster, Leinwand oder Alu-Dibond
- Photographing the environment for fireworks
- Other
Quick start - photograph fireworks
Quick start
- Requirements: Your camera should have manual settings. Manual aperture, ISO and shutter speed are necessary. A tripod, remote shutter release and wide-angle lens are also helpful.
- Usually the aperture varies depending on the brightness of the effects. As an all-rounder aperture for photographing fireworks, I recommend f/13 to f/16.
- Set the ISO value of your camera to 100, so that the photo will have the least noise.
- The shutter speed depends on how much effect you want to expose on your photo. The easiest way is to use the BULB mode of your camera.
- With the remote shutter release and BULB mode, you can now decide for yourself how long you want to expose your photos. For New Year’s Eve, you can expose between 10 and 30 seconds. For big professional shows between 4 and 10 seconds.
There are many occasions to photograph fireworks. For a birthday party, a wedding, a city festival or classic New Year’s Eve. Every now and then you get the pleasure to watch a beautiful fireworks and want to photograph for the memory.
Therefore, I make sure to give you values with which you can create good fireworks photos without post-processing on the computer. Because not everyone wants to buy Photoshop or Lightroom. But keep in mind that fireworks are dynamic light, which is stronger at the beginning and weaker at the end. The processing on the PC can correct these light differences in depth.
Contents
- The equipment
- Camera
- Objectiv
- Tripod
- Ball head
- Remote control
- The technical
- Shooting mode
- Aperture setting
- ISO setting
- Exposure time
- White balance
- Focusing
- Image stabilizer
- Focal length
- The environment
- Location
- Positioning
- Other
- Tips
How fireworks work
The colors of the fireworks effects in the sky are produced depending on the mixture of chemicals and salts used. Mixtures containing substances from the group of alkali metals and alkaline earth metals are particularly effective.
The alkali metals include, for example, sodium, which we know in the form of table salt (sodium chloride) and produces the color yellow. Other alkali and alkaline earth metals, such as potassium salts, produce the color purple. Barium salts green, strontium salts red, and magnesium salts produce white effects. Other element groups such as copper salts produce the blue color.
For this reason, it is important to experiment with aperture when photographing fireworks. Since we are talking about light here, some effect colors are darker, others lighter to very bright. More about this in the „Aperture“ section.
The equipment for photographing fireworks
The camera
Many amateur photographers are already put off by the equipment. But it is no problem at all to take fireworks photos without professional equipment. Your camera only needs to master four features to be able to photograph beautiful fireworks:
- Manual aperture
- Manual ISO
- Manual shutter speed
- Manual shooting mode
Of course, a professional camera has its advantages, which make for an even more beautiful picture, especially in terms of photographing fireworks. In addition to the more brilliant colors and the lower image noise, the fireworks photos can be better edited on the PC afterwards, because the basis of the photos is a so-called RAW photo. In a RAW photo, all image information is stored ROH and can be edited afterwards finer. A JPEG, on the other hand, is already a fully exposed photo.
If you are about to buy a new camera, you are often spoiled for choice or better; spoiled for choice! First, set yourself a maximum budget and see which SLR cameras or mirrorless cameras (system cameras) come into question for you. If you want a mirrorless camera, don’t be afraid to look around on the second-hand market. Mirrorless cameras often have the advantage that they do not wear out as quickly. SLR cameras are often more robust and, of course, larger.
As good entry-level cameras up to 600 euros, I can unreservedly recommend the following three models of different brands:
My proposed Nikon and Canon budget cameras are SLRs with all the required features that are important for shooting fireworks. The Sony a6000 is a mirrorless camera for the pocket. All three cameras offer RAW photo support, but no 4K video function.
The choice of lens
The lens is more important than the camera itself. Especially when photographing fireworks at night. The lens represents the eye in photography and bad eyes need glasses.
However, since this article is about how you as a beginner achieve the best possible fireworks photos with your equipment, I will only discreetly address the topic of lens selection. I would simply not get to the point, because the choice of good as well as bad lenses is enormous. Therefore, a few lines further down, a small recommendation from me.
To be as prepared as possible for all possible situations, it is recommended to use a wide-angle lens. On APS-C (crop) cameras, I would recommend lenses with a focal length between 11 and 16 mm. On full-frame cameras, a focal length between 16 and 24 mm. With this, you are already well positioned and quite flexible as far as the location is concerned.
Please have a look at the manual lenses of the Walimex Pro series for SLR cameras and system cameras. These are exceptionally good for a small price. The downside is that are often only manual lenses without auto focus. An inexpensive but good lens with autofocus is the Tokina 11-16 for APS-C cameras. This is available for Canon as well as Nikon and Sony A cameras.
The tripod
In order to take the beautiful and typical fireworks photos with the long drawn light trails, it is recommended to use a tripod. Simply for the reason that the camera must not shake. As soon as the camera shakes or trembles, the tremors are transferred to the light trails and already the perfect photo is only half as beautiful.
Since fireworks are set off exclusively in the open air, you have to take Mother Nature’s moods into account. If she’s in a bad mood, it can get quite windy. And to counteract gusts of wind as efficiently as possible, I recommend using tripods made of metal or carbon. Plastic tripods often lack stability and unnecessarily increase the risk of blurry photos. In addition, plastic tripods are not robust and quickly break down, become brittle and eventually break.
I can recommend the following models as good entry-level tripods:
- CULLMANN Nanomax Reisestativ incl. ball head
- CULLMANN Revomax incl. ball head
The use of a tripod should not be underestimated in photography. My two example tripods are entry-level tripods that provide quite good protection. However, if fireworks photography is taken more seriously, tripods from the Italian company Manfrotto are almost indispensable. Robust, durable and weatherproof.
The ball head
The ball head is probably the best invention next to the cable tie. The ball head facilitates the alignment of the camera when photographing fireworks enormously. Because often the ground on which the tripod is set up is not level. The ball head is screwed onto the tripod and the camera is attached to the top of the ball head. From now on, it no longer matters how crooked the tripod was set up. The camera is aligned in seconds using the ball head.
My two tripod recommendations already have a ball head. However, the ball head is not mandatory. It only facilitates the project.
Remote control
Equally useful when photographing fireworks is a remote control. The advantage of a remote control is that we are able to determine the exposure time ourselves. Another advantage, we do not come into contact with the camera and thus avoid that the camera shakes. So we can trigger from a distance.
There are many remote triggers on the market. The simplest remote triggers are either wired or communicate with the camera via infrared. A third variant are remote triggers that communicate with the smartphone via Bluetooth or WLan. The smartphone then sends the received commands back to the camera.
In my opinion, however, this is all technical schnick Schnack. I still use a wired remote release from a cheap company for 12 euros and it works flawlessly. Remote triggers that communicate via smartphone are only interesting if you want to take time-lapse pictures. However, wired remote triggers that were developed for this purpose also do this job.
Remote triggers via smartphone are not recommended for photographing fireworks, as they have a certain latency. With fireworks, it often depends on the exact moment.
The technical
You are really brave ;) But now let’s get to the fireworks photography itself and all the important camera settings to consider.
Fireworks photography is all about the right settings. Have you forgotten something to note here, the photo is often ruined or does not meet your expectations. And that is often the reason why many give up. Despite the fact that fireworks take place quite often throughout the year, it is often like Christmas. It comes as a surprise.
Before you start taking pictures, make sure you have everything with you. Believe me, I have forgotten the memory card more often than fingers on hands.
- Memory card empty and packed?
- Batteries charged?
- Tripod plate on the camera?
- Tripod ready to hand?
- Lens clean?
- Remote release packed?
- Good weather ordered?
Capture mode
Your camera provides you with a few different shooting modes via a mode dial. You can use these to decide whether the camera should automatically determine all settings such as shutter speed, aperture and ISO or whether you want to set the settings completely manually. Select the „M“ mode for manual.
Aperture setting
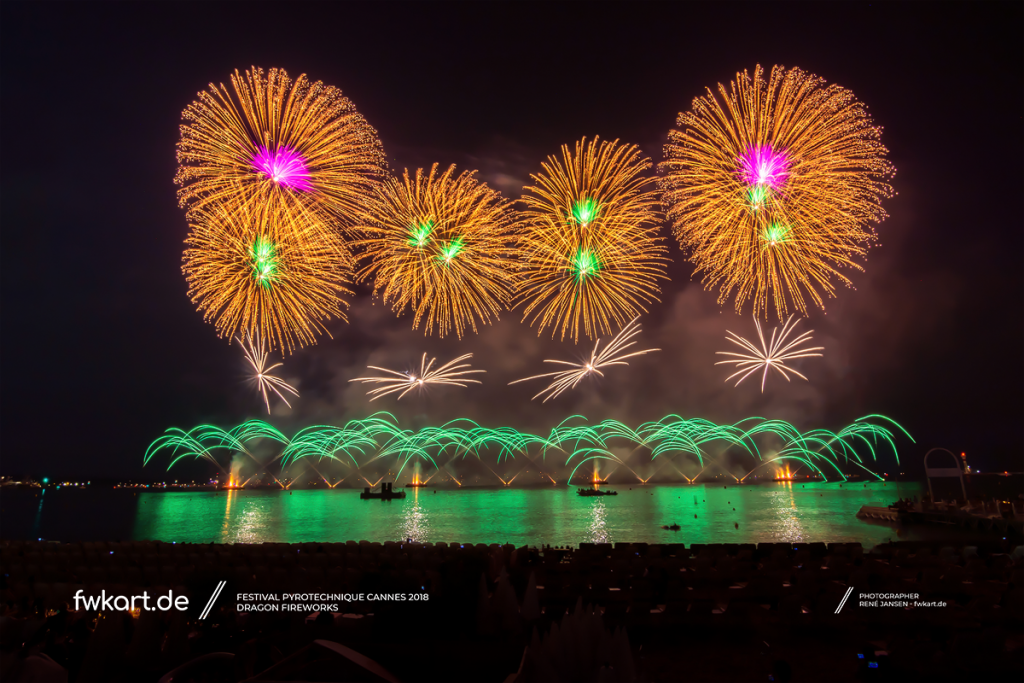
All the colors seen in the sky are products of various salts that burn when the firework explodes. Using the correct aperture settings depends on several factors; how bright is the effect, how far away am I standing from the fireworks, and what is the weather like. The brighter the effect in the sky, the more closed (larger number) the aperture needs to be. The darker the effect, the more open (smaller number).
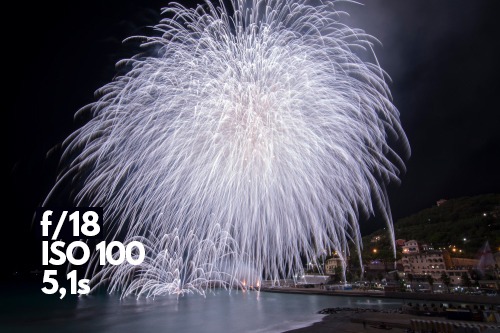
- White, Silver | Aperture f/16 – f/18
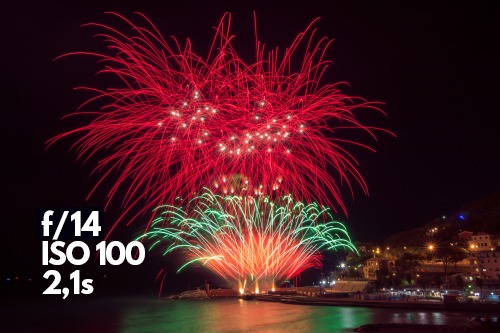
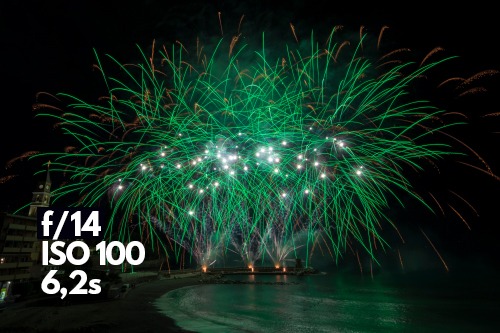
- Green, Turquoise, Yellow, Orange, Red, Pink | Aperture f/13 – f/14
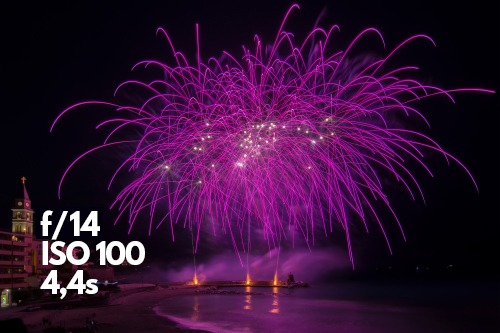
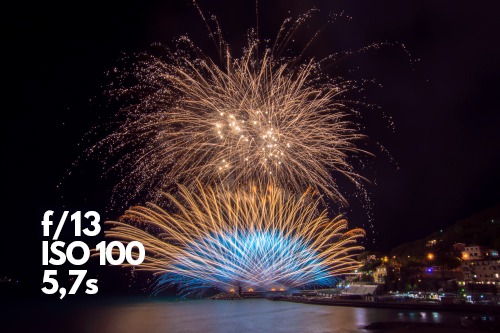
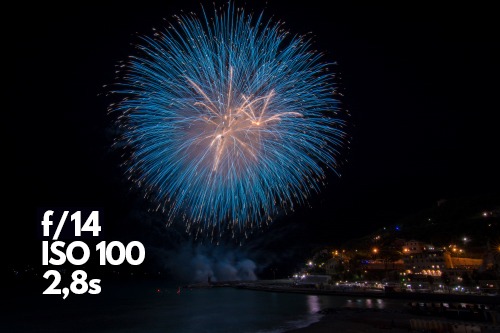
- Gold, Violet, Blue | Aperture f/11 – f/13
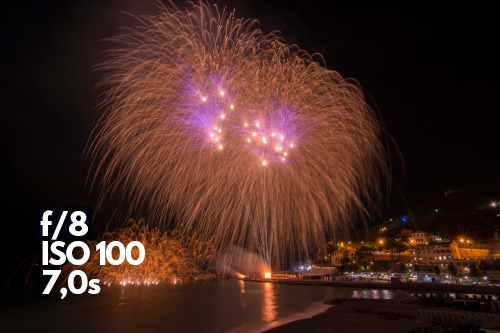
- Bronze gold (Kamuro) | aperture f/8 – f/10
I am aware that it is difficult to set the optimal aperture. After all, as a beginner, you never know what color will be shot next. As an absolute rule of thumb, I would therefore recommend an aperture value between f/11 and f/13. As an all-rounder, aperture f/13 for subsequent processing on the PC.
I personally shoot exclusively with aperture f/14. This has two reasons: 1) I perform the exposure correction on the PC. With aperture f/14 I have more room to maneuver in terms of, for example, the overblending of effects. 2) I have years of experience in timing and I know what will happen next and how long the pyrotechnician will shoot that particular scene. However, anyone can learn this over time.
The distance to the fireworks also plays a role when photographing fireworks and can affect the aperture values. High humidity may cause the water particles in the air to combine with the fine dust from the fireworks, creating a haze. This causes the fireworks to glow somewhat darker. This is exactly what happens on dry summer nights. Here, dust particles in the air are a disturbing factor.
It also often happens that pink and blue appear very dark in the sky. The luminosity is missing. Or green looks rather pale in photos. This is because the burned salts are of inferior quality. However, these are factors that only the pyrotechnician can influence.
ISO settings
ISO is nothing more than the artificial amplification of the light falling on the sensor. The ISO of your camera amplifies the residual light that falls on the camera sensor.
The disadvantage is that the higher the ISO value – i.e. the more light you artificially amplify – the more the photo starts to crackle. The well-known ISO noise arises. And you don’t want that on a fireworks photo. Therefore, set your camera to an ISO of 100. My recommendations in this tutorial are also based on this ISO value.
Some cameras also offer ISO 50 support. If you choose this, you will have to subtract one f-stop from my specifications, especially for the aperture setting. Instead of aperture f/18, use aperture f/16.
Camera ISO levels
The ISO levels commonly used by cameras today are as follows:
25, 50, 64, 100, 200, 250, 320, 400, 500, 640, 800, 1000, 1250, 1600, 2000, 2500, 3200, 4000, 5000, 6400, 8000, 10000, 12800, 16000, 20000, 25600
Exposure time
The shutter speed or exposure time determines how long the photo should be exposed. In other words, the duration in which the light falls on the sensor. Usually a shutter speed of 1/30 is set. However, to photograph fireworks, you should turn the dial that adjusts the shutter speed to the seconds range. For fireworks photos, it is recommended to turn the wheel to the BULB setting and trigger it by remote control.
Luminous points in the sky lose luminosity and speed after a certain time. Therefore, it is not possible to say across the board that the luminous trace length doubles. At the beginning, i.e. after the opening of the effect in the sky, the energy of the spread is the highest and decreases after already 3 seconds.
Brocade gold, for example, in contrast to color dots, can trail many times longer and must therefore be evaluated separately.
You will do best with 3 to 6 seconds exposure time. These are the usual times for photographing fireworks. Colored effects need about 3 seconds exposure time. Dark gold finales, on the other hand, can take up to 6 seconds or more. However, if a colorful finale is being shot with many effects in the sky, an exposure time between 1 and 3 seconds is often sufficient.
There are also cameras that do not support BULB exposure. If you have just such a model, set the shutter speed between 3″ and 6″. The quotes stand for „seconds“.
White balance
The different colors in the sky are produced by chemical processes, as discussed at the beginning. Since we are talking about artificially generated light here, we have different white balance situations in fireworks. This is because, strictly speaking, each color has a different Kelvin. Since we are talking about artificially generated colors (light) here, we find different artificial light conditions throughout the fireworks.
Therefore, there is no general recommendation as to which Kelvin value we need to set. There is only a compromise. Basically, we can say that the compromise here is a value of 4000. „White“ effects are the most difficult to photograph. If the Kelvin value is set too cold, „white“ looks bluish; if the Kelvin value is set too warm, „white“ looks yellowish. And in combination with other colors, something can quickly emerge that was definitely not there.
But in order to be able to judge the picture exactly, you have to remember the moment to be able to say; yes this effect was really white. So it’s not so bad if the effect doesn’t match 100% with reality. Nobody notices that anyway.
Deactivate image stabilizer
When using a tripod, it is recommended that you disable the image stabilizer on your lens or camera. The image stabilizer often causes blurry shots when gusts of wind hit the camera and the image stabilizer tries to compensate for the shocks. This is an issue that should not be underestimated, especially when taking long exposures and at night.
The result is blurred light traces of the effects.
Focusing
Most mistakes in fireworks photography happen in focusing. Many photographers rely too much on their automatic focus and autofocus on the moon or some lantern 3 km away. In some cases this seems to work, especially with wide angle lenses. Fireworks are 3-dimensional and are set up at different levels.
The fireworks are usually set up at the burning site around afternoon. For example, to be prepared the next time you visit a fireworks display in your city, visit the event in the afternoon if possible, look around the area and take your camera position. This way you can adjust the focus point during the day.
If you can only enter the area in the evening, look for a lantern that is at about the same height as the front position of the fireworks. With a wide-angle lens, however, it is often sufficient to set the focus to infinity. All of this takes some practice and most importantly; knowledge of your lens. It also happens to me that a few photos are incorrectly focused. But that’s more due to stress.
Front positions like volcanoes, comets are often positioned close to the audience, whereas the bombs are set up further back. This distance between front -and rear position can be between 50 and 100 meters in a normal city festival fireworks. The distance of the fireworks from the audience can be calculated approximately at 200 meters of protective distance. Rule of thumb: caliber (mm) = height of climb (m) = distance (protective distance in meters).
So, if the pyrotechnician shoots a maximum caliber of 150 mm, the protective distance is about 150 to 200 meters. Therefore, autofocus is not recommended. Please try to focus manually.
If you don’t have a lantern nearby, use the long exposure of your camera to define the front position in the dark. Expose with 30 seconds or longer.
Focal length
No sooner have you decided on a camera and photographed your first fireworks than you realize relatively quickly that the lens does not have sufficient focal length. The standard kit lenses on entry-level cameras often have a focal length between 18 and 55 mm. This is often sufficient, since you are standing relatively far away from the fireworks anyway, especially at the beginning. If you want to get closer to the light spectacle, you won’t get far with this focal length.
A wide angle lens or also called UWW lens is available quite cheap. I can recommend the wide-angle lens Tokina 11-16 DXII and the Walimex Pro 14mm f2.8. With under 500 euros also not really expensive. The Tokina lens has autofocus, whereas the Walimex Pro is entirely manual.
As a focal length, it is recommended to go into the wide-angle or ultra-wide-angle range. A focal length of 11 mm on an APS-C camera or 16 mm on a full-frame camera is almost mandatory in order to have as much latitude as possible.
Photographing the environment for fireworks
Location
The location is an issue that should not be underestimated. Of course, as a beginner you don’t think about where the fireworks are shot, whether trees or buildings prevent the view, the landscape is hilly or whether the launch site is in a valley.
But it is precisely this prior knowledge that is often decisive and often a question of taste in image composition. Therefore, it is advisable to view the location via Google Maps or other map services before the fireworks. I find hiking maps with elevation profiles very useful. This way you can see exactly if hills or mountains are blocking the view.
As already mentioned in the section „Focus“, the protective distance of the fireworks to the audience is often about 200 meters. This information is helpful in that you can already roughly estimate where you can/should/must position yourself with the help of Google Maps. Then you draw an imaginary line and position your camera in such a way that you achieve the most interesting photo possible.
Positioning
Fireworks on photo look very impressive when the eye has a reference point. That is, when photographing fireworks, try to shape the image by including trees or buildings in the photo. At a fair, a Ferris wheel or roller coaster always looks very impressive next to fireworks in the background. The eye has a point of reference and size comparison. This makes the fireworks look much more effective.
In a city, it is then often trees or other structures such as churches, which you can integrate very well into the photo. Give the photo more dynamics when photographing fireworks. It is also helpful to stand slightly elevated. This reduces the risk of people’s heads blocking the view of the fireworks.
Not to be underestimated is to understand the weather forecast. This is because smoke/dew is often the worst thing that can happen to you when photographing fireworks. Either the fireworks disappear in thick clouds of smoke or the lens fogs up. Therefore, try to understand the weather data to know in advance how high the risk of smoke and fog is.
Other
Tips:
A good tip is to pack papers, i.e. cigarette paper, in your photo backpack. I use cigarette paper to wipe fingerprints off the lens. In my opinion, this works much better than using microfiber cloths. Microfiber cloths get wet very quickly and so fingerprints (grease) cannot be removed as effectively and a light layer of grease forms.
It is also useful to let the camera acclimatize. That is, take your camera out of your backpack or bag 1 hour before. At night, temperatures drop, which is why there is a temperature difference with the outside temperature and the temperature inside your camera. Acclimatizing your camera reduces the risk of the lens fogging up.
The links marked with a superscript 1 are so-called affiliate links. If you click on such an affiliate link and buy through this link, I get a commission from the online store or provider. The price does not change for you. So you don’t pay a cent more, but you support us.
